好了,tflite文件我们分析完了。我也知道,你稍微有点懂,但还不至于全懂。看完后面,可能会有所改善。
三、用Python调用模型文件
下面,我们先把输入层的数据组织好,然后调用文件试试看。
我们这个模型的输入层的形状是[1, 640, 640, 3]。
其实展开是这样:
图片列表
图片数据
图片1
640*640个像素点,每个点用(R,G,B)3种色值表示
图片2
640*640个像素点,每个点用(R,G,B)3种色值表示
图片……
640*640个像素点,每个点用(R,G,B)3种色值表示
我们先忽略多个图片,只考虑一张图片的情况,这样能简单些。
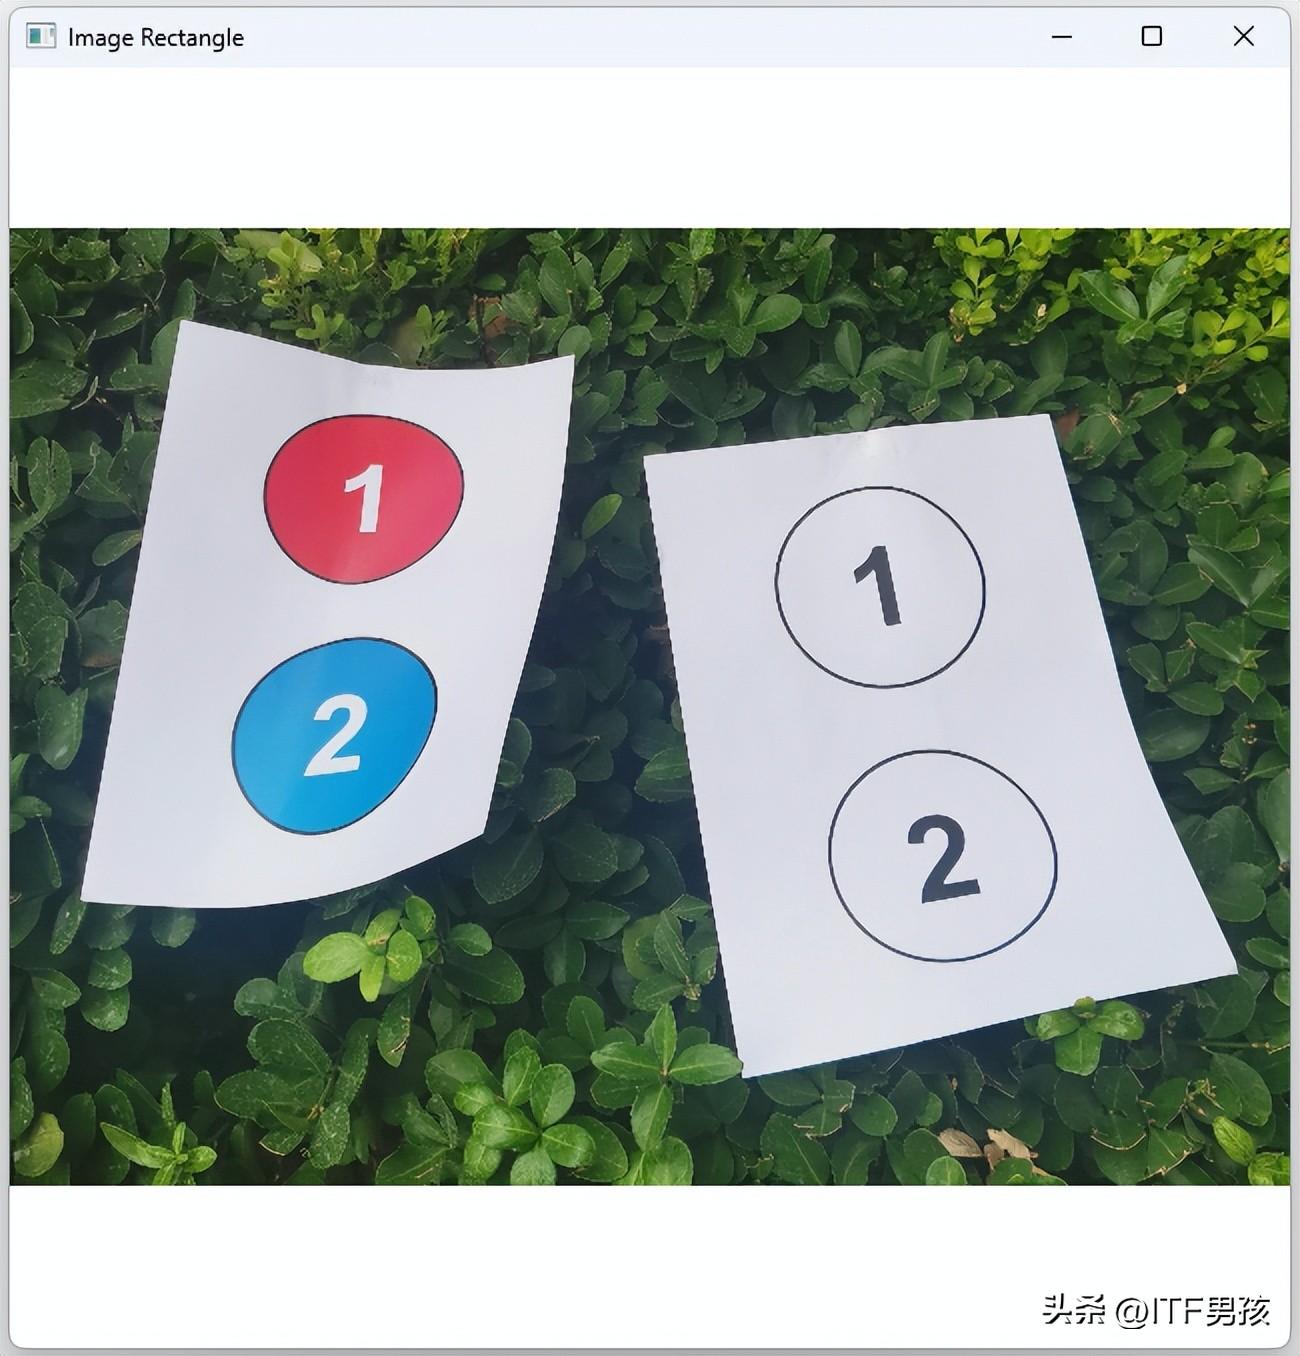
来读这么一张图片。

3.1 图片的读取
我们读取一下它的数值:
import cv2
image = cv2.imread('num.jpg')
print(image.shape)
cv2.imread会把一张图片读取成矩阵数据。image.shape是数据的形状,由3部分构成:图片高/矩阵行数,图片宽/矩阵列数,色彩通道数。
这张图片的shape打印出来是(2162, 2883, 3)。这表示图片尺寸为2883×2162,通道数为3。
我们如果在它的外面套一层,加一个[],它就可以变成(1, 2162, 2883, 3)。但是,现在我们首先要把它的尺寸变为(640, 640, 3),因为输入层的格式是(1, 640, 640, 3)。
到这里,你或许有点质疑,这640是怎么来的,谁规定的?我用960行不行?
兄弟,不行的。你没法用小麦粒充当面粉往馒头机里放。
3.2 输入数据的预处理
真想要追根溯源,得说你当初用YOLOv8训练时,只执行了一句model.train(data="num.yaml", epochs=80),并没有做其他设置。而未设置的,会走一个默认配置,这个配置在Lib\site-packages\ultralytics\cfg下,名字叫default.yaml,里面就有一个imgsz就是640。一个值,表示640×640是正方形,两个值可以设置宽与高。

看我文章,跟听书似的,能涨不少周边知识。
我们要检测的图片,可能来自摄像头,可能来自用户上传,这个咱们不能限制。我们要做的是将图片修改成640×640。
def pre_img(image):
    height, width, _ = image.shape
    # 等比例缩放
    if height > width:
        new_height = 640
        new_width = int(640 * width / height)
    else:
        new_width = 640
        new_height = int(640 * height / width)
    image_resized = cv2.resize(image, (new_width, new_height))
    # 创建一个640*640的白色背景图像
    background = np.ones((640, 640, 3), dtype=np.uint8) * 255
    # 将缩放后的图像粘贴到背景图像的中心位置
    start_x = (640 - new_width) // 2
    start_y = (640 - new_height) // 2
    background[start_y:start_y+new_height, start_x:start_x+new_width] = image_resized
    return background
resize_image = pre_img(image)
为了凑一幅640×640的图像,我们采用的处理方式是:不管图片大小,先让它顶着边放大或者缩小到640×640的框里,然后背景设为白色。
此时打印resize_image.shape就看到了久违的(640, 640, 3)。
注意,要开始调用模型了!
3.3 执行推理
调用很简单,代码加注释,保证你一看就会!
# 单张图片数据转为浮点型
input_image_f32 = resize_image.astype(dtype=np.float32)/ 255
# 外面包一层[]组成[1, 640, 640, 3]
input_data = np.expand_dims(input_image_f32, axis=0)
# 将input_data数据塞给输入层,从索引找到
input_index = input_details[0]['index'] # 输入的索引
interpreter.set_tensor(input_index, input_data)
# 跑一跑
interpreter.invoke()
# 将输出层的数据拿出来,从索引确定输出层
output_index = output_details[0]['index'] # 输出层的索引
detect_scores = interpreter.get_tensor(output_index)
print(detect_scores.shape, detect_scores)
最后来数据了,就是那个detect_scores。
3.4 输出数据分析
detect_scores.shape:
(1, 6, 8400)
detect_scores:
 array([[[7.9783527e-03, 2.5762582e-02, 3.6012750e-02, ...,
          8.1423753e-01, 8.3901447e-01, 9.1082019e-01],
          ...
          1.8597868e-03, 1.8911671e-03, 1.9312450e-03]]], dtype=float32)
输出数据的形状是(1, 6, 8400)。
看输入数据的形状,有经验的老CV师傅,尚且能猜到是图片数据。但现在看这个输出数据的形状,就真的需要你对YOLOv8算法稍微了解才行喽。
我给大家解释一下,这些维度都代表什么。
解释之前,得再往回倒历史,YOLO是You Only Look Once的简称。这种算法,只需要在图上扫一遍就够了。因为有的算法,需要对图片扫描多遍才能实现目标检测。
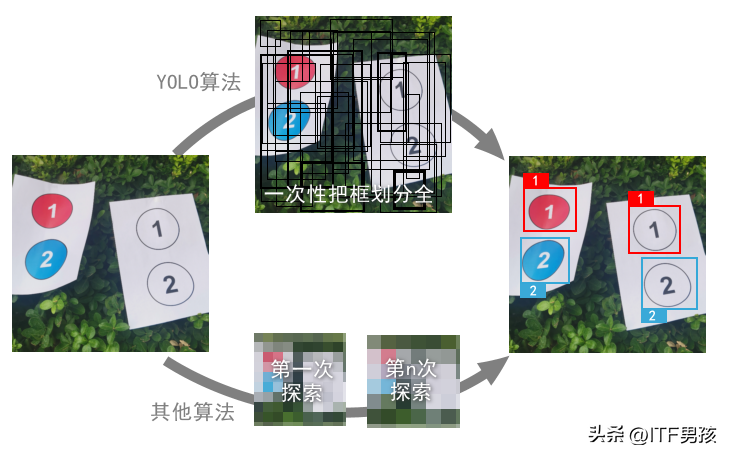
于是,YOLO会设置一个最小网格作为基本单位,划分出非常多的大大小小的框。然后检测这些框里面是否有目标,以及是某种物体类型的可行性。
我只训练标注了①②两类目标,所以分类数量是2。
下面就容易理解这个模型的输出啦。
3.4.1 输出层格式解析
维度数值
解释
图片批次大小,有几张图片。1代表一张
8400
一张图中划分出的8400个小区域
6个数代表 (中心点x, 中心点y, 宽度w, 高度h, 分类1的得分, 分类2的得分)
我们仍然只关注一张图片,并且把数据处理一下。
 # 降维 (1, 6, 8400) -> (6, 8400)
detect_score = np.squeeze(detect_scores)
# 转换 (6, 8400) -> (8400, 6)
output_data = np.transpose(detect_score)
打印一个数据看看print(output_data[0]),输出为:
[0.01971355 0.01480704 0.04122782 0.03146162 0.00014795 0.0001379 ]
这是8400个框中第1个框的数据,6位数就是上面表格里对应的6个含义。
我想画一下这些框。但是可以想象,画面肯定就糊了。咱们这样,只画出类别概率大于某个数值的框。
# 前4个是矩形框 x, y, width, height
boxes = output_data[:, :4]
# 后2个是①的概率,②的概率
scores = output_data[:, 4:]
# 计算每个边界框最高的得分
max_scores = np.max(scores, axis=1)
# 找到满足一定准确率的框【修改点在这里】
keep = max_scores >= 0.6
# 得到符合条件的边界框和得分
filtered_boxes, filtered_scores = boxes[keep], scores[keep]
rimge = resize_image.copy()
(height, width) = rimge.shape[:2]
for i, box in enumerate(filtered_boxes):
    x,y,w,h = box
    # x,y 是中心点的坐标,而且是占宽高的百分比
    x1,y1 = (x-w/2)*width, (y-w/2)*height
    x2,y2 = (x+w/2)*width, (y+w/2)*height
    cv2.rectangle(rimge, (int(x1), int(y1)), (int(x2), int(y2)),  (0, 0, 255), 1)
下图是我画出概率大于0.01和0.601的框,可以看出区别还是挺明显的。

似乎我们已经从输出数据,找到了目标和位置。
等会儿……好像还有一个问题,框的重复情况比较严重。产生的原因就是前面说的8400个框。
3.4.2 NMS非极大值抑制
看下图,这3个区域,都是合格的网格,而且也都检测到了目标。你不能说它们谁有错!
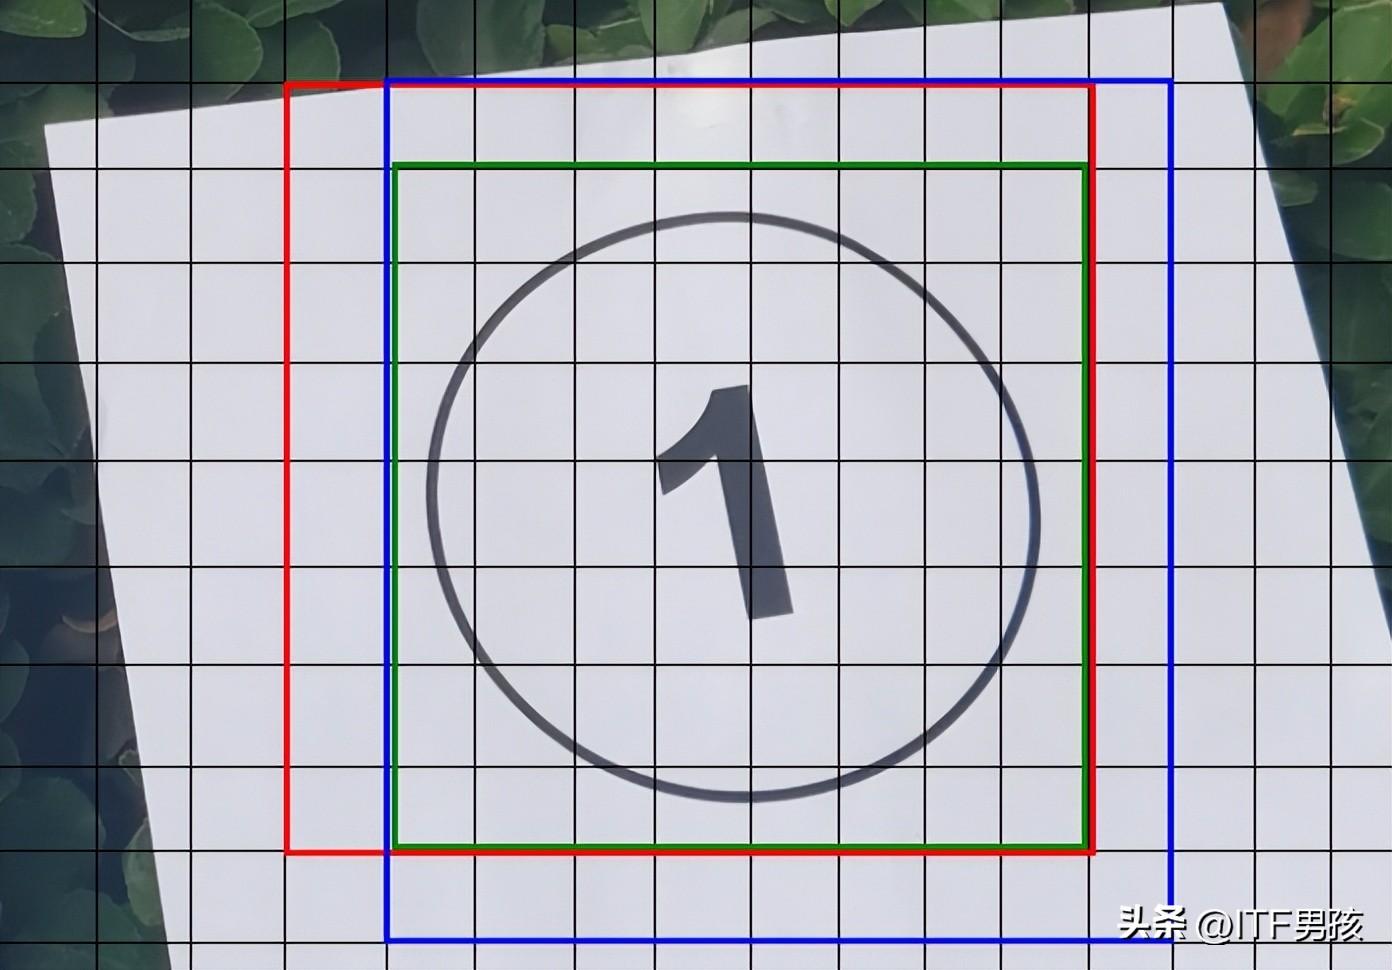
这可……怎么办?
此时,你再看开篇那张图,有读者说“是不是NMS不包含?”。我说他们真的有需求,而且用心看了是有原因的。NMS全称是Non-Maximum Suppression,换成中国话就是“非极大值抑制”。
通俗来讲,就是排除同类弱者,因此叫非极大值抑制。好比IT界要选出各个开发语言的代表人物,来了1000多口子,300多Java,600多PHP。大家一对比,啊,都是干Java的,都搞多并发,留一个最好的,剩下的多并发走人。那边有两个人一对比,你是Java,我是PHP,咱们是两类人,没冲突,都留下。最后,肯定就剩下最具有代表性的人了。
我们选用哪些个框的方案,也是同样的道理。技术实现上,就用到了IoU。不是I LOVE U啊,是IoU。全称是intersection over union,就是……你甭管叫啥。我告诉你怎么处理,上代码。
def iou(box1, box2):
    # 计算交集区域的坐标
    x1 = max(box1[0], box2[0])
    y1 = max(box1[1], box2[1])
    x2 = min(box1[2], box2[2])
    y2 = min(box1[3], box2[3])
    # 计算交集区域的面积
    inter_area = max(0, x2 - x1 + 1) * max(0, y2 - y1 + 1)
    # 计算两个边界框的面积
    box1_area = (box1[2] - box1[0] + 1) * (box1[3] - box1[1] + 1)
    box2_area = (box2[2] - box2[0] + 1) * (box2[3] - box2[1] + 1)
    # 计算IoU
    iou = inter_area / float(box1_area + box2_area - inter_area)
    return iou
这个iou方法的输出,实现的是两个矩形框的交集除以并集。先求出box1、box2的面积,再求出box1和box2重合的面积。最后,用重合面积除以两个框合占的面积。
来一个图就明白啦。

其实就是重合度,0表示不重合,1表示完全一样,0.6表示重叠60%。
那下面,我们就去抑郁……不是,去抑制非极大值就行啦。
# 抑制非极大值方法
def non_max_suppression(boxes, scores, threshold=0.8):
    # 创建一个用于存储保留的边界框的列表
    keep = []
    # 对得分进行排序
    order = scores.argsort()[::-1]
    # 循环直到所有边界框都被检查
    while order.size > 0:
        # 将当前最大得分的边界框添加到keep中
        i = order[0]
        keep.append(i)
        # 计算剩余边界框与当前边界框的IoU
        ious = np.array([iou(boxes[i], boxes[j]) for j in order[1:]])
        # 找到与当前边界框IoU小于阈值的边界框
        inds = np.where(ious <= threshold)[0]
        # 更新order,只保留那些与当前边界框IoU小于阈值的边界框
        order = order[inds + 1]
    return keep
# 计算每个边界框的最高得分
max_scores = np.max(filtered_scores, axis=1)
# 进行处理
keep = non_max_suppression(filtered_boxes, max_scores)
# 最后留下的候选框
final_boxes = filtered_boxes[keep]
final_scores = filtered_scores[keep]
# 目标的索引
indexs = np.argmax(final_scores, axis=1)
上面代码,将这些高质量的候选框,先按照得分进行排序,然后拿最高分跟其他候选对比。凡是重合度高的,去掉,重合率低的,保留。这个操作就实现了一山不容二虎。
3.5 呈现最终结果
我们把之前画框的代码,稍微改动一下。
for i, box in enumerate(final_boxes):
    ……
    color_v = (0, 0, 255) if indexs[i] == 0 else (255, 0, 0)
    cv2.rectangle(rimge, (int(x1), int(y1)), (int(x2), int(y2)),  color_v, 2)
加了一个判断,如果是第①个类别用红色,第②个类别用蓝色。
运行效果如下:
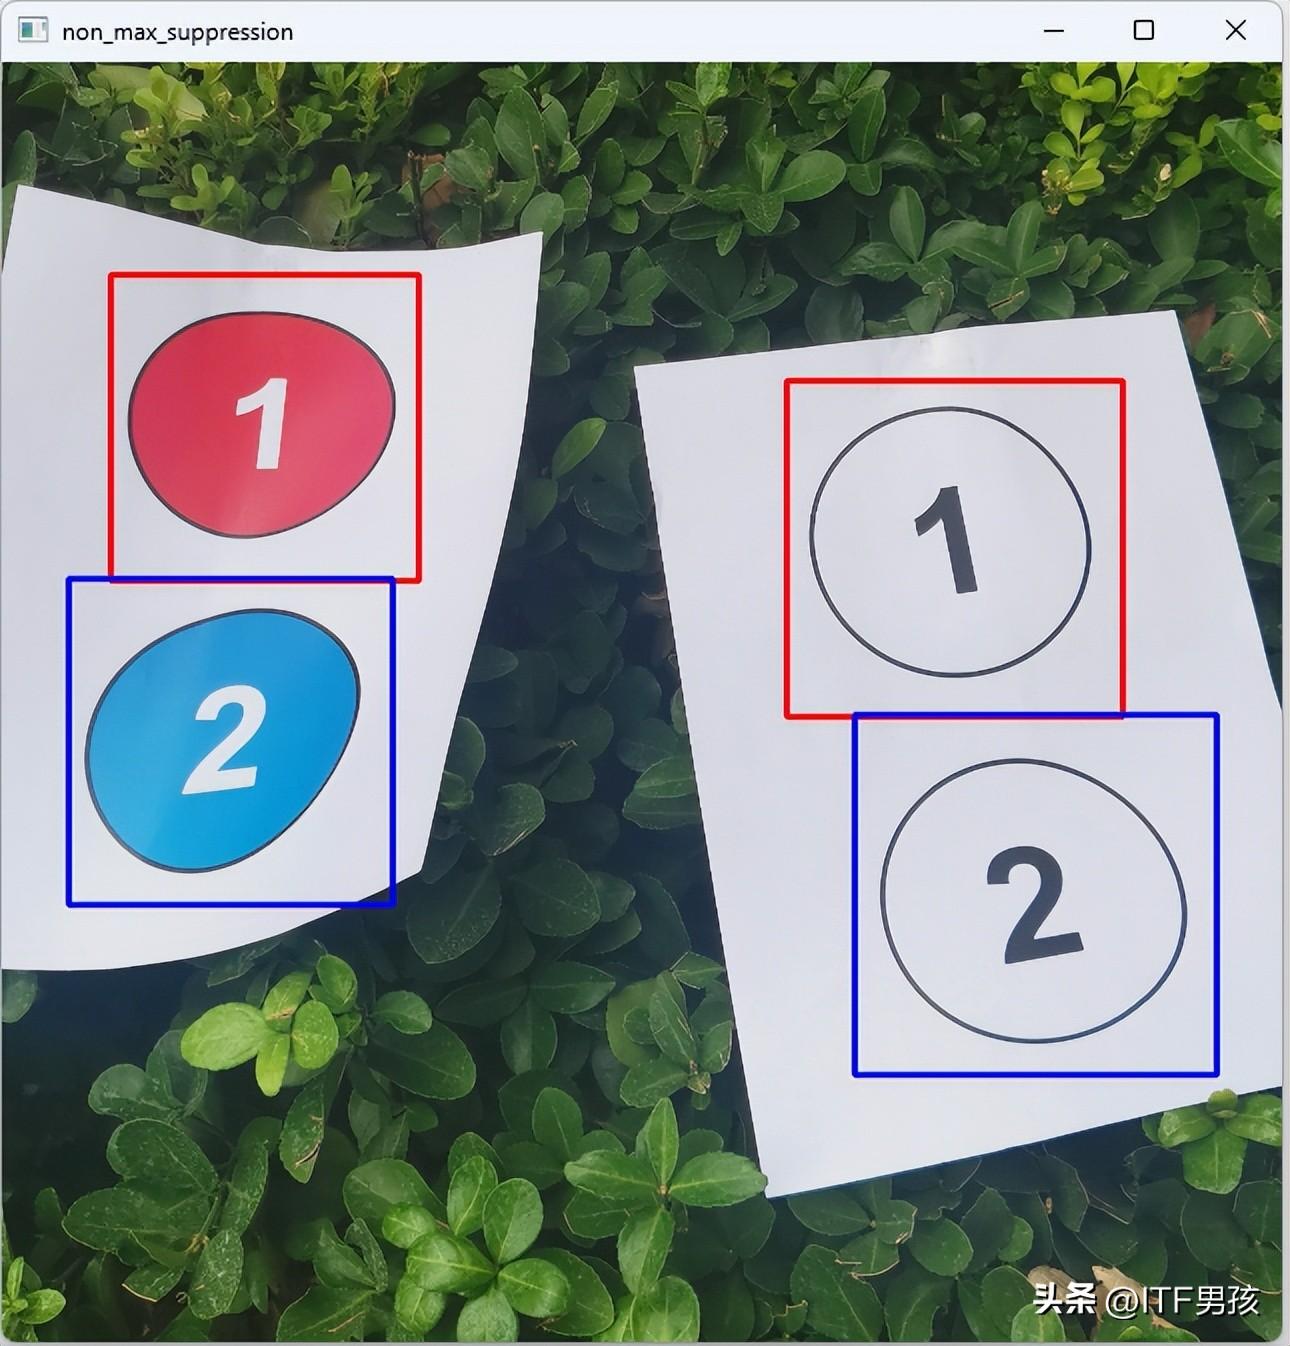
怎么样,我们用.tflite格式完成了目标检测。这与在PyTorch下的.pt文件是一样的效果。
那个读者问,是不是不包含nms?兄弟,有很多成熟的类库可以一句话调用。但是,退一万步讲,就算咱用原生代码自己去写一套,也没有多少行代码。
所以我讲原理很重要,平台只是一个媒介。
下面,咱们就前往Android的世界,再去实现这一套流程。
四、用Android调用模型文件
首先声明,存在比我下面讲的,还要简单的实现方法。这个我是知道的。
比如多导入以下两个包,可以很方便地处理关于模型加载,图像与数据转换,甚至NMS的问题。那样,没几行代码。
implementation 'org.tensorflow:tensorflow-lite-support:0.3.0'
implementation 'org.tensorflow:tensorflow-lite-task-vision:0.3.0'
但是,我吹了牛了,我说原理可以不受平台限制。因此,我只导入基本的tensorflow-lite包,用来加载tflite文件。其他全用Java代码来写(Kotlin也一样)。
implementation 'org.tensorflow:tensorflow-lite:2.5.0'
4.1 加载模型并推理
首先,build.gradle导入上面最基本的tensorflow-lite包。然后,将我们的best_num_int8.tflite文件,拷贝到assets文件下。
我的文件结构如下所示:

其中,DetectTool.java是我自己写的一个检测工具类,负责加载tflite模型,处理图片的缩放,以及分析模型输出层的数据。NonMaxSuppression.java也是自己手敲的一个处理非极大值抑制的算法类。
首先,加载tflite文件。
import org.tensorflow.lite.Interpreter;
public class DetectTool {
    // 从Assets下加载.tflite文件
    private static MappedByteBuffer loadModelFile(Context context, String fileName) throws IOException {
        AssetFileDescriptor fileDescriptor = context.getAssets().openFd(fileName);
        FileInputStream inputStream = new FileInputStream(fileDescriptor.getFileDescriptor());
        FileChannel fileChannel = inputStream.getChannel();
        long startOffset = fileDescriptor.getStartOffset();
        long declaredLength = fileDescriptor.getDeclaredLength();
        return fileChannel.map(FileChannel.MapMode.READ_ONLY, startOffset, declaredLength);
    }
    // 构建Interpreter,这是tflite文件的解释器
    public static Interpreter getInterpreter(Context context){
        Interpreter.Options options = new Interpreter.Options();
        options.setNumThreads(4);
        Interpreter interpreter = null;
        try {
            interpreter = new Interpreter(loadModelFile(context, "best_num_int8.tflite"), options);
        } catch (IOException e) {
            throw new RuntimeException("Error loading model file.", e);
        }
        return interpreter;
    }
}
注意,执行这一步时,需要在build.gradle中配置不要压缩.tflite文件(默认是压缩的)。
android {
    // 新增:不要压缩tflite文件
    aaptOptions {
        noCompress "tflite"
    }
此时,你就可以在Activity中使用Interpreter了。
// 构建解释器
Interpreter interpreter = DetectTool.getInterpreter(this);
// 将要处理的Bitmap图像缩放为640×640
Bitmap resize_bitmap = resizeBitmap(bitmap, 640);
// 转换为输入层(1, 640, 640, 3)结构的float数组
float[][][][] input_arr = bitmapToFloatArray(resize_bitmap);
// 构建一个空的输出结构
float[][][] outArray = new float[1][6][8400];
// 运行解释器,input_arr是输入,它会将结果写到outArray中
interpreter.run(input_arr, outArray);
你仍然可以用interpreter的各种get方法获取输入输出的层信息。但是,基于前面我们已经了解了它的结构,因此现在可以直接构建对应的结构。
4.2 输入预处理详解
其中,resizeBitmap方法与bitmapToFloatArray方法是自己写的。
resizeBitmap用于图片尺寸缩放。
public static Bitmap resizeBitmap(Bitmap source, int maxSize) {
    int outWidth;
    int outHeight;
    int inWidth = source.getWidth();
    int inHeight = source.getHeight();
    if(inWidth > inHeight){
        outWidth = maxSize;
        outHeight = (inHeight * maxSize) / inWidth;
    } else {
        outHeight = maxSize;
        outWidth = (inWidth * maxSize) / inHeight;
    }
    Bitmap resizedBitmap = Bitmap.createScaledBitmap(source, outWidth, outHeight, false);
    Bitmap outputImage = Bitmap.createBitmap(maxSize, maxSize, Bitmap.Config.ARGB_8888);
    Canvas canvas = new Canvas(outputImage);
    canvas.drawColor(Color.WHITE);
    int left = (maxSize - outWidth) / 2;
    int top = (maxSize - outHeight) / 2;
    canvas.drawBitmap(resizedBitmap, left, top, null);
    return outputImage;
bitmapToFloatArray是构建输入层的数据格式。
public static float[][][][] bitmapToFloatArray(Bitmap bitmap) {
    int height = bitmap.getHeight();
    int width = bitmap.getWidth();
    // 初始化一个float数组
    float[][][][] result = new float[1][height][width][3];
    for (int i = 0; i < height; ++i) {
        for (int j = 0; j < width; ++j) {
            // 获取像素值
            int pixel = bitmap.getPixel(j, i);
            // 将RGB值分离并进行标准化(假设你需要将颜色值标准化到0-1之间)
            result[0][i][j][0] = ((pixel >> 16) & 0xFF) / 255.0f;
            result[0][i][j][1] = ((pixel >> 8) & 0xFF) / 255.0f;
            result[0][i][j][2] = (pixel & 0xFF) / 255.0f;
        }
    }
    return result;
}
Bitmap是图片,可以是一张本地图片文件,也可以是从相机的预览回调传来的每一帧图像。
只要通过interpreter.run(input_arr, outArray)后,outArray中就有了结果数据,它的形状就是我们熟悉的那个(1, 6, 8400)。
用python时,我们全程是手写算法。在Java中,一样可以做到。
4.3 输出数据的处理
// 取出(1, 6, 8400)中的(6, 8400)
float[][] matrix_2d = outArray[0];
// (6, 8400)变为(8400, 6)
float[][] outputMatrix = new float[8400][6];
for (int i = 0; i < 8400; i++) {
    for (int j = 0; j < 6; j++) {
        outputMatrix[i][j] = matrix_2d[j][i];
    }
}
float threshold = 0.6f; // 类别准确率筛选
float non_max = 0.8f; // nms非极大值抑制
ArrayList boxes = new ArrayList<>();
ArrayList maxScores = new ArrayList();
for (float[] detection : outputMatrix) {
    // 6位数中的后两位是两类的置信度
    float[] score = Arrays.copyOfRange(detection, 4, 6);
    float maxValue = score[0];
    float maxIndex = 0;
    for(int i=1; i < score.length;i++){
        if(score[i] > maxValue){ // 找出最大的一项
            maxValue = score[i];
            maxIndex = i;
        }
    }
    if (maxValue >= threshold) { // 如果置信度超过60%则记录
        detection[4] = maxIndex;
        detection[5] = maxValue;
        boxes.add(detection); // 筛选后的框
        maxScores.add(maxValue); // 筛选后的准确率
    }
}
这段实现和python区别很大。因为原生Java代码在处理矩阵上基本全靠循环。它不像python可以一句话获取矩阵的横向平均值、竖向最大值。
因此,我将那6位数中的detection[4]设置为最大值的分类索引,detection[5]存储最大值的分值。
到这里,我们就获取到了分类概率大于60%的所有备选框。这时同样会出现框重复的情况。需要做一个NMS。
public class NonMaxSuppression {
    public static float iou(float[] box1, float[] box2) {
        float x1 = Math.max(box1[0], box2[0]);
        float y1 = Math.max(box1[1], box2[1]);
        float x2 = Math.min(box1[2], box2[2]);
        float y2 = Math.min(box1[3], box2[3]);
        float interArea = Math.max(0, x2 - x1 + 1) * Math.max(0, y2 - y1 + 1);
        float box1Area = (box1[2] - box1[0] + 1) * (box1[3] - box1[1] + 1);
        float box2Area = (box2[2] - box2[0] + 1) * (box2[3] - box2[1] + 1);
        return interArea / (box1Area + box2Area - interArea);
    }
    public static List nonMaxSuppression(List boxes, List scores, float threshold){
        List result = new ArrayList<>();
        while (!boxes.isEmpty()) {
            int bestScoreIdx = scores.indexOf(Collections.max(scores));
            float[] bestBox = boxes.get(bestScoreIdx);
            result.add(bestBox);
            boxes.remove(bestScoreIdx);
            scores.remove(bestScoreIdx);
            List newBoxes = new ArrayList<>();
            List newScores = new ArrayList<>();
            for (int i = 0; i < boxes.size(); i++) {
                if (iou(bestBox, boxes.get(i)) < threshold) {
                    newBoxes.add(boxes.get(i));
                    newScores.add(scores.get(i));
                }
            }
            boxes = newBoxes;
            scores = newScores;
        }
        return result;
    }
}
iou的计算几乎和python的处理一样。nonMaxSuppression则根据Java语法特性,变化了一些。
但是,原理是不变。都是先按照分数排名,然后忽略和高分重合度高的,收录重合率低的。
最后的result是最终结果,它是一个列表,每个子项里面6个数,分别是:中心点x、中心点y、框的宽width、框的高height、属于哪一类class_index、置信概率值。
就是这样,Android也成功实现了。你在程序里调用就可以。


