本篇文章的内容与LCD/HDMI OUT的内容关系不大,事件上报是内核与上层通信的一种方式,在有些时候需要上报一些插拔事件或者上报分辨率等信息时会接触到。还是和之前的文章一样,本篇文章将介绍三种事件上报的方式但是只是介绍具体操作步骤,而理论知识以及上报过程需要自己找资料理解。
一、kobject事件上报及验证
kobject是高通自带的上报接口之一,调用kobject_uevent函数即可上报,以下为为电源插拔做的事件上报,并建立进程接受到上报事件后重置USB的示例。
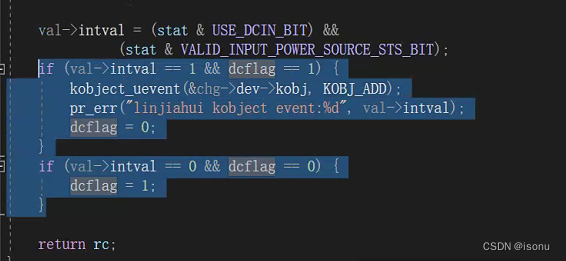
首先找到电源驱动并找到电源插拔函数,添加事件上报的函数:


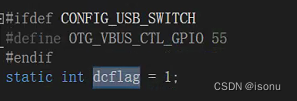
intval表示是否插入电源,当其为1使表示插入,为0时表示拔出,因为插入与拔出会有物理抖动,所以在这里加入了一个dcflag消抖。在插入的判断中加入kobject事件上报,需要注意的是这里的第一个参数为设备结构体中的kobj,如果没有设备结构体则需要自己添加。第二个参数表示事件上报类型,一般为ADD类型。
到这里内核的事件上报已经结束,但是我们无法得知上报是否有效,所以可以自己建立一个进程来接受上报的事件。在这不细讲进程的几种状态了,可以自己去了解,大致是事件上报打破了进程的阻塞态使其运行需要执行的功能。
接下来是建立进程的步骤,不具体介绍为什么加在某个文件,按照流程这样做成功后可以自己去学习一下。
首先是自己写一个功能函数,这里的文件和大学写的demo是一样的,只不过需要调用一些自己不熟悉的接口来实现想要的功能,比如我是需要接收到事件上报的消息进行USB重置:
#include
#include
#include
#include
#include
#include
#include
#include
#include
#include
#define UEVENT_MSG_LEN  1024
#define TF09_PATH_MAX  128
struct usb_device_descriptor {
        unsigned char bLength;
        unsigned char bDescriptorType;
        unsigned short int bcdUSB;
        unsigned char bDeviceClass;
        unsigned char bDeviceSubClass;
        unsigned char bDeviceProtocol;
        unsigned char bMaxPacketSize0;
        unsigned short int idVendor;
        unsigned short int idProduct;
        unsigned short int bcdDevice;
        unsigned char iManufacturer;
        unsigned char iProduct;
        unsigned char iSerialNumber;
        unsigned char bNumConfigurations;
} __attribute__ ((packed));
const static char * usbpath[] = {"/dev/bus/usb/001", "/dev/bus/usb/002"}; //usb devfs可能存在的位置
int find_device()
{
    DIR * usb_dir;
    struct dirent *bus;
    char devpath[TF09_PATH_MAX];
    struct usb_device_descriptor dev_des;
    int fd, usb_index = 0 ;    //查找usb设备的总线位置c
    for(usb_index=0;usb_index<(sizeof(usbpath)/sizeof(char*));usb_index++)    //搜索并打开总线所在目录
    {
        usb_dir = opendir(usbpath[usb_index]);
        if (NULL != usb_dir){
            while(NULL != (bus=readdir(usb_dir))) //读取usb devfs下的每一项,即bus
            {
                if(!strchr("1234567890", bus->d_name[0]))
                    continue;
                snprintf(devpath, TF09_PATH_MAX, "%s/%s", usbpath[usb_index], bus->d_name);
//                ALOGE("linjiahui devpath =%s\n",devpath);
        		if(strstr(devpath,"/dev/bus/usb/001/001") != NULL || strstr(devpath,"/dev/bus/usb/002/001") != NULL){
					ALOGE("linjiahui 001001");
        		}
				else{
					if((fd = open(devpath, O_RDWR))<0)
                    continue;
                    if(read(fd, (void *)(&dev_des), sizeof(dev_des)) > 0) //客户需要的设备
                    {
                    ALOGE("dev_des.idVendor==%x ,dev_des.idProduct==%x\n",dev_des.idVendor ,dev_des.idProduct);
                    }else{
                    close(fd);
                }
			  }
           }
        }
    }
    return 0;
}
int reset_sdr()
{
    int fd, usb_index = 0;
    int ret = 0;
	DIR * usb_dir;
	struct dirent *bus;
	struct usb_device_descriptor dev_des;
	char devpath[TF09_PATH_MAX];

	for(usb_index=0;usb_index<(sizeof(usbpath)/sizeof(char*));usb_index++)
	{
		usb_dir = opendir(usbpath[usb_index]);
		if (NULL != usb_dir){
			while(NULL != (bus=readdir(usb_dir)))
			{
				if(!strchr("1234567890", bus->d_name[0]))
                        continue;
                snprintf(devpath, TF09_PATH_MAX, "%s/%s", usbpath[usb_index], bus->d_name);
					fd = open(devpath, O_WRONLY);
					ALOGE("linjiahui 001001:%s", devpath);
					if (fd < 0)
    				{
        				ALOGE("linjiahui Failed to open file");
    				}
					ALOGE("linjiahui ioctl Resetting USB device %s\n", devpath);
					if(read(fd, (void *)(&dev_des), sizeof(dev_des)) > 0)
					ret = ioctl(fd, USBDEVFS_RESET, 0);
					if (ret < 0)
					{
					ALOGE("linjiahui The ioctl operation failed %s\n",devpath);
					}
			}
		}
	}
    close(fd);
    return 0;
}
int main()
{
    int device_fd;
    char msg[UEVENT_MSG_LEN+2];
    int n;
    int i;
    char str[] = "c200000.dwc3";
    ALOGE("linjiahui FAIOT unplug service start!\n");
    device_fd = uevent_open_socket(64*1024, true);
    if(device_fd < 0){
        ALOGE("linjiahui FAIOT uevent_open_socket fail!\n");
        return -1;
    }

    while ((n = uevent_kernel_multicast_recv(device_fd, msg, UEVENT_MSG_LEN)) > 0) {
        msg[n] = '\0';
        msg[n+1] = '\0';
        for (i = 0; i < n; i++)
            if (msg[i] == '\0')
                msg[i] = ' ';
//		ALOGE("linjiahui linjiahui linjiahui:%s\n", msg);
        if(strstr(msg,str))
        {
            ALOGE("%s\n", msg);
            ALOGE("linjiahui usb unplug\n");
//          find_device();						//read device
			reset_sdr();						//reset device
        }
    }
    return 0;
}
文件内容主要分为主函数,find device和reset device这几个函数,主函数接受到事件上报进行USB设备的查询与重置,很多内容其实网上也可以找到,只不过有时候需要根据自己的实际情况修改一下。需要弄明白的是主函数中的事件接受方法:先自己创建一个关键词的字符串,这类关键词可以使用上报的驱动名称或者上报类型,根据不同情况修改。接下来用while循环来接收事件,判断事件的内容中是否有关键词str,如果有则执行寻找与重置USB操作。至于寻找与重置USB操作的函数就不讲了,因为需要按照不同需求来写代码。
当处理接收事件的进程服务写好之后,还需要在编译时运行到该服务以及在运行时给这个服务一定权限才可以。接下来就是这一系列操作的步骤:
在AP/extern文件夹中建立自己的进程文件夹比如叫unplug,在unplug中添加上述代码的.c文件,再建立Android.bp文件添加以下内容:
cc_binary {
    name: "unplug",
    vendor:true,
    shared_libs: [
        "libcutils",
        "liblog",
        "libutils",
    ],
    srcs: [
        "unplug.c",
    ],
}
在sdm660_Android10_AP\device\qcom\common\rootdir\etc\init.qcom.rc中添加
chmod 0777 /vendor/bin/unplug给服务进程777的权限,即可读可写。
在项目文件夹下找到sdm660_Android10_AP\device\qcom\项目名\init.target.rc文件添加unplug服务
service unplug /vendor/bin/unplug
    class main
    user root
    group root
    capabilities SYS_NICE
在该文件夹中的mk文件中添加编译规则:
ifeq ($(TARGET_PRODUCT), 项目名)
#add for USB unplug
PRODUCT_PACKAGES += \
    unplug
endif
最后在sdm660_Android10_AP\device\qcom\sepolicy\vendor\common中添加unplug.te文件写入以下内容增加服务权限:
type unplug, domain;
type unplug_exec, exec_type, vendor_file_type, file_type;
init_daemon_domain(unplug)
allow unplug usb_device:dir { search read open };
allow unplug usb_device:chr_file { open read write };
allow unplug unplug:netlink_kobject_uevent_socket { create setopt getopt bind read };
并在本文件夹的file_contexts中添加:
/(vendor|system/vendor)/bin/unplug u:object_r:unplug_exec:s0步骤就这么多,关于te文件中的selinux的权限添加请自行上网搜索如何添加或者用下载脚本添加,本人对selinux不是很熟悉。
以上是一整个完整的流程,从编译到下载到建立服务到接收事件处理事件,有一种比较方便的调试方法可以不用整编烧录验证:在unplug文件夹下执行mm单编,然后在out目录下找到vender\bin\unplug的文件直接将其adb push进机器,然后在shell中chmod 777一下给个权限,直接运行即可,因为没有之前的调试截图,所以只能口述,如果遇到问题及时分析原因修改。
一整个kobject事件上报加服务验证的流程到这里已经结束,如果掌握整个流程的调试方法那接下来的键值上报和sysyfs_notify上报理解起来很简单。
二、键值上报
键值上报一般用于按键或者插拔接口等操作,通常一个GPIO对应一个按键,一个按键对应一个键值,所以上报的事件也是唯一的。插拔和按键的原理是一样的,都会改变GPIO的状态,所以在做键值上报时也是完全一样,下面以845平台插拔为例介绍键值上报的操作流程:
首先找到AP/frameworks/base/data/keyboards/Generic.kl文件,找一个没有用到的键值:
# key 188   F18
# key 189   F19
# key 190   F20
# key 191   F21
# key 192   F22
# key 193   F23
# key 194   F24
# key 195 "HDMI_OUT"            //原本为# key 195 (undefined)
# key 196 (undefined)
# key 197 (undefined)
# key 198 (undefined)
定义为自己的功能描述。
在设备树sdm845-mtp中加入按键默认状态:
&soc {
	gpio_keys {
		compatible = "gpio-keys";
		label = "gpio-keys";
		pinctrl-names = "default";
		pinctrl-0 = <&key_vol_up_default
			     &key_cam_snapshot_default
			     &key_cam_focus_default
			     &key_reset_default
				 &key_hdmi_out_default>;            //添加pinctrl
		vol_up {
			...
            ...
		};
		cam_snapshot {
			...
            ...
		};
		cam_focus {
			...
            ...
		};
		reset {
			...
            ...
		};

		hdmi_out_detect {                        //添加按键节点
			label = "hdmi_out_detect";
			gpios = <&tlmm 117 GPIO_ACTIVE_LOW>;
			linux,input-type = 事件;
			linux,code = <0xC3>;                //为195的十六进制表示
			gpio-key,wakeup;
			debounce-interval = ;
			linux,can-disable;
		};
	};
};
;
linux,can-disable;
};
};
};需要注意这里的linux,code为第一步定义的键值的十六进制表示。
既然用到&key_hdmi_out_default那就需要在pinctrl设备树中加入对应节点:
key_reset {
			key_reset_default: key_reset_default {
				...
                ...
			};
		};
		key_hdmi_out {
			key_hdmi_out_default: key_hdmi_out_default {
				pins = "gpio117";
				function = "gpio";
				input-enable;
				bias-pull-up;
				power-source = ;
			};
		};
在AP/device/qcom/sdm845/gpio-keys.kl文件中加入键值定义:
key 115   VOLUME_UP
key 114   VOLUME_DOWN
key 102   HOME
key 528   FOCUS
key 766   CAMERA
key 195	  HDMI_OUT            //增加此定义
注意这里的195为之前定义键值C3的十进制表示。
至此按键上报功能已经实现,当然这是基于GPIO是可控的状态。
将代码编译烧录之后进入adb shell,然后分别执行su,getevent,按下按键或者插拔接口会有键值上报,则成功。
三、sysfs_notify事件上报
这类事件上报和kobject上报是一样的,只不过这个基于建立的节点来上报事件,之前也讲过如何建立节点,现在介绍另一种建立节点的办法来进行sysfs_notify事件上报:
static ssize_t hpd_det_show(struct device *dev,
         struct device_attribute *attr, char *buf)
{
	int gpio_state = gpio_get_value(hpd1_det_gpio);
	sprintf(buf, "%d\n", gpio_state);
	return strlen(buf);
}
 static ssize_t hpd_det_store(struct device *dev,
         struct device_attribute *attr, const char *buf,
         size_t count)
{
	return count;
}
static struct device_attribute hpd_det_dev_attr = {
     .attr = {
         .name = "state",
         .mode = S_IRWXU|S_IRWXG|S_IRWXO,
     },
     .show = hpd_det_show,
     .store = hpd_det_store,
 };
 static int create_hpd_det_node(void)
 {

	 struct class *lt9612_node_class = NULL;
	 static struct device *hpd_det_dev = NULL;
	 int ret = 0;
	lt9612_node_class = class_create(THIS_MODULE, "lt9612_node");
	if(IS_ERR(lt9612_node_class))
	{
		ret = PTR_ERR(lt9612_node_class);
		pr_err("Failed to create class.\n");
		return ret;
	}

	 hpd_det_dev = device_create(lt9612_node_class, NULL, 0, NULL, "hdmi1_hpd_det");

		 if (IS_ERR(hpd_det_dev))
		 {
			 ret = PTR_ERR(hpd_det_dev);
			 pr_err("Failed to create device(hpd_det_dev)!\n");
			 return ret;
		 }

		 ret = device_create_file(hpd_det_dev, &hpd_det_dev_attr);

		 if(ret)
		 {
			 pr_err("%s: hpd_det_dev creat sysfs failed\n",__func__);
			 return ret;
		 }
	 return 0;
 }
static int lt9612_probe(struct i2c_client *client, const struct i2c_device_id *id)
{
    ret = create_hpd_det_node();
	if(ret < 0) {
		pr_err("create_hpd_det_node() failed."); //在probe函数中调用建立节点的函数
	}
}
先从probe看调用了建立节点的函数,在函数中进行了文件创建与功能实现。在notify的事件上报中最重要的还是得得到一个device的结构体进行事件上报,下面是notify的一个小示例:
struct device *hdmi_0;
static DEVICE_ATTR(hdmi_0_state, S_IWUSR|S_IRUSR, show_hdmi_0_state, NULL);
// init
int xxx_init(...)
{
    ...
    hdmi_0 = device_create(cls, 0, MKDEV(major,0),NULL,"hdmi_0");
    sysfs_create_file(&(hdmi_0->kobj), &dev_attr_hdmi_0_state.attr);
}

// when state changed
int xxx_on_state_changed(...)
{
    ...
    sysfs_notify(&(hdmi_0->kobj), NULL, "hdmi_0_state");
    ...
}
在这个示例中把hdmi_0定义为一个全局结构体指针,这样就不需要再在函数中传参了,sysfs_notify就那一句话,第一个参数为上报的设备,第三个参数为上报事件名称,第二个参数一般为NULL,这时候再观察刚刚建立节点的示例,它只在create_hpd_det_node函数中创建了一个设备结构体指针,当需要在节点发生变化调用节点读写操作时还需要传参给读写函数,比较麻烦,可以把它定义为全局变量直接调用。
这类事件也需要配合上层来接受事件然后处理,因为本人没有接触过所以就介绍到这里。
四、总结
本文主要介绍了三种事件上报的方法与简单的原理,事件上报还是比较常用的特别是配合节点使用,所以需要自己调试与理解。